BBA Design:
Foundations
Advanced Projects
BBA Design:
Foundations
Advanced Projects
Final Project 2019-2020: A Deep Exploration of a Common Object.
ASSESSMENT RUBRIC FOR THE FINAL PROJECT
THE PROJECT
Introduction
This final project*allows you demonstrate your ability to investigate and describe the world in the form of a small booklet, and by focusing on a single object. The criteria measured by the exercise include: the capacity to conceptualize, creativity, curiosity, analytical ability, intuition, openness, and perseverance. It is important that you read, understand, and follow the directions below. There is no single correct way to respond to this challenge, only the opportunity for you to creatively explore and communicate.
The Challenge
A designer’s work is that of giving form to ideas. This requires an ability to investigate and describe the world around us as a means to imagine new possibilities for conveying meaning. In this project you will investigate and describe a common object in a way that conveys your unique capacities to interpret and imagine the world.
That object will be a piece of fruit.
The Process
First, select and acquire the fruit of your choice. It is essential that you purchase an actual piece of fruit that you can physically interact with (something you can get locally).
In the course of this project you will investigate its different aspects. Describe as many of these aspects as you think important. Through the questions you choose to investigate, and the ways you describe the fruit, give me a sense of your capacity to observe, interpret and imagine.
Your investigations could (but need not be limited to) look into the following questions:
Your process of acquiring the fruit:
How did you get it? Where did you get it? What kind of store was it from? What kind of journey did you take to get there? Who owned this fruit before you? Why did you choose this fruit?
The fruit’s physical and tactile dimensions:
How does it look? How big is it? What does it look like inside? How do you take it apart? How heavy is it? How hard or soft is it? How does it smell? Taste? Feel? What is its composition?
The fruit’s origins:
Where is the fruit from? (get specific!) How did it get to where it is? Can you describe the fruit’s lifetime journey? What is its place in the ecosystem?
The fruit’s cultural associations:
How, for example, has it been represented in literature, popular culture or visual art? Where does the fruit get its name from? What role does it play in the society and economy?
The fruit’s future:
What will become of the fruit once you are finished with it? What are the natural processes and social systems that complete its journey?
Some more suggestions:
· Begin with a dictionary definition of your fruit.
· Find and include passages from literature (novels, stories, poetry) about your fruit.
· Consider how your fruit is depicted in visual art - its symbolism (use well known or iconic examples). What are the fruit’s denotative and connotative meanings?
· Include factual information about your fruit (economic statistics, scientific facts, charts, maps).
· Look at advertisements and other types of popular culture imagery (movies/tv etc.) Explore the ways your fruit is displayed and packaged.
IMPORTANT!
You should MAKE YOUR OWN IMAGES as much as possible. Don’t just rely on the internet exclusively and cut and paste. Doing so is not original, creative or interesting. If you use images from online sources, explore altering them, by using other media. IF YOU USE IMAGES THAT ARE COPYRIGHT PROTECTED YOU MUST EITHER: ALTER THE IMAGE SIGNIFICANTLY, OR CITE THE SOURCE (ON THE BACK COVER OF THE BOOKLET) THERE IS A 12 IMAGE LIMIT FOR INTERNET IMAGES FOR THE ENTIRE PROJECT.
More thoughts on process:
Review the course units from this year. Is there useful information that can help you decide how best to approach your project?
Review your own projects for the year. Is there some aspect of one or more of them that might give you a start on this final project. Is there a particular technique or approach to making that you enjoyed, want to explore more, or was a challenge? Or, you might want to try something new.
Begin by re-reading the prompts (above) carefully. Then, in your sketchbook, begin to respond to the ones you think are most interesting. It is important to document your thinking and your process. The Prompts should guide your research and give you new ways to think about your fruit.
Begin brainstorming as soon as possible and document your visual thinking in your sketchbook. Begin making and experimenting as soon as possible. Individual elements of your book can be created separately from the book and then pasted in, as well as created directly in the book itself. I suggest doing one or more mock-ups(prototypes) of your entire booklet with simple printer paper before starting on the final version.
THE FORM
The “book” format allows you to tell a story, make an argument or create relationships using the 12 pages available to you. The pages should communicate the questions that are relevant to you about the fruit and your particular capacity to describe and interpret the findings of your investigation.
There are two options for creating the booklet pick the one that you prefer:
Analog:
This option will be a small booklet of 12 pages (using both sides of 3 sheets of 8.5x11” paper folded in half – paper provided) which includes the front and back cover. If you have access to digital tools then you are welcome to use them and incorporate any images made into the project, but the finished project must be a physical booklet. You are encouraged to use any medium, (pen, pencil, colored pencil, marker, crayon, computer drawing, water color, or non-traditional medium), and work in a format (illustration, painting, collage, photography, diagram, measured drawing, pop up or altered book techniques), with which you are comfortable and enjoy. Feel free to use more than one medium or technique. Text should be included but should be limited to 20 words or less per page. You should think of typography as another design element at your disposal.
Digital: Required for International Students
This option will be in the form of an e-booklet of 12 pages formatted to be 8.5x11”/5.5x8.5”. You may use PowerPoint, Keynote, or Goggle Slides. Please export final product as a PDF document. See me for details. Keep in mind that I do not simply want you to create a typical “presentation”. Rather your booklet should look, and “feel” like a book, and should adhere to all of the criteria and expectations of this project. Your own “hand” should be evident in the final product. You are encouraged to use digital painting, drawing, collage, photography, scanned analog work, as well as other options such as links to other text, images (video and stills). Text should be included but should be limited to 20 words or less per page. You should think of typography as another design element at your disposal.
ASSESSMENT
Your project will be assessed on:
The Book:
· How well you demonstrate the capacity to describe, conceptualize, analyze, investigate, creatively problem solve, and persevere in this project.
· How well you demonstrate the effective use of the mediums, tools and processes to accomplish your design. In other words, is it well made? Organization and care in the making of the booklet are important.
· How well you have used the language of form and color (the elements and principles of design) to express your ideas, information, thoughts or feelings about the subject of your study.
· How well did you create a coherent story, argument, or set of relationships that make a statement about your fruit?
The Reflection:
In addition to the book you will write a short (2-3 paragraph) artist’s statement/reflection for this work. If working analog, it must be typed on a separate 8.5x11” sheet. If working digitally, it can be added as an additional page to your e-book. It should address the following:
· Describe your process and approach for the making of the book. (Explain your choices).
· Describe the challenges you faced and how you did, or didn’t, overcome them.
· For additional criteria and guidance use this link: Scroll down to the section on artist’s statements. https://bbadesign.jimdofree.com/critique-reflections-artist-statements/
Materials Provided
You have received in your packet (use if doing the analog option):
· 4 sheets of white drawing paper size: 8.5x11” (only one extra if you mess up!)
· 1 set of instructions.
· A return envelope.
I am happy to provide any additional media, materials, or tools (markers, pencils, drawing tools scissors, utility knifes, adhesives, colored paper etc.) with the understanding that you will return the unused portion to me at the end of the project. Arrangements to pick up these things should be made on an individual basis with me.
Timeline:
There will be three graded check in activities in OnCampus and the Final deadline. For each check in assignment please provide documentation of your process. This can be photographs of your sketchbook or prototypes and post on your website in a new page: Final Project
|
Date |
Tasks |
|
Check in #1 Week of 5/4 Due: |
Select and acquire the fruit of your choice. Working in your sketchbook, begin your review of the units and projects we completed this year. Respond to the prompts. Begin researching and developing a way of approaching the project. This should be done in your sketchbook. |
|
Check in #2 Week of 5/11 Due:
|
Continue Research. Begin making and collecting images. Create a mock-up of your book (using plain printer paper) Begin thinking about how you will arrange your exploration. |
|
Check in #3 Week of 5/18 Due:
|
Continue to explore the prompts and generate new images. Organize your elements into a coherent whole. Create a final protoype/draft of your booklet |
|
Final project and artist’s statement Week of 5/25 due
|
Analog booklets: Create and complete the final copy of your booklet using the paper provided. Create and print your artist’s statement. Booklets and statement must be either mailed back to me using the envelope provided, and postmarked no later than 5/29, or (if circumstances permit) they may be dropped off at school. (details to follow). Digital “e-books” and statement must be shared with me via email as a pdf document.
|
Bottom Line:
AMAZE me with your work!
* This final project is freely based on the 2018 Aptitude Exercise given as a part of the student applications (for incoming freshmen), to the Department of Architecture at the University of Hong Kong I have altered the original assignment. pm
Final Project (alternate) Place and the Four Seasons
In this culminating project for the class, you will create a series of four panels which take as their theme, your personal relationship to a specific place as it changes through the four seasons. Through the use of line, shape, color, value, repetition and rhythm, typography, your four panels should reflect your response to the particular season - and yet all four must still be unified and work as a whole single work. Similarity and difference with the goal of overall unity.
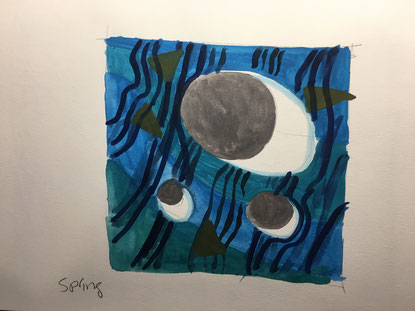
In the sample above you can see below that I made four square art boards. Your four panels to not have to be square. The can vary in size and shape. This project will be created in a physical form, even if you have worked digitally (it will be printed out and either applied to some kind of backing or in some kind of frame. There are many creative ways you can approach this project!
The colors, shapes and images you select and how you arrange them should be based on your own personal experiences and memories. Here are some suggestions of ways to approach this project.
Important Note: Use predominately abstract or semi-abstract shapes for this project.You may use some literal representations (actual images) of objects particularly if you are doing collage/assemblage with found images or objects, but you should avoid "making a picture" in the traditional sense. You may represent real objects with abstract or semi-abstract shapes which suggest them. You may incorporate expressive drawing into your composition. So, for instance, you convey the idea of a house (its warmth, its stability, comfort, security etc.) instead of just making a literal picture of a house. Each panel must have some amount of text that does NOT include the name of the season or a specific month, incorporated into the composition.
- Your compositions can tell the story of change over the seasons, by using a specific place and showing how it transforms into something very different.
- Your composition could reflect your different emotional responses to the seasons, are you happier in summer or winter? Do you feel melancholy or nostalgic in the fall, hopeful or optimistic in the spring?
- Your composition could be a physical response to the season - warm and cozy in the winter, or relaxing outside in the summer. What kinds of physical activities do you participate in during each season? How might these be represented with form and color?
- This should be a place that you have a significant personal connection to. It can be an interior or exterior space.
- Consider the passage of time and of memory. (time can be both cyclical and linear).
You can use any of the materials and techniques and/or combinations of them that we have covered in class:
- cut or torn paper - collage
- found images and/or objects -assemblage /collage
- paint, markers etc. colored pencils or any traditional media
- digital- Photoshop and/or Illustrator Procreate, Affinity Designer
I encourage you to experiment with different combinations of materials and techniques and to try things you haven't tried before - particularly in the early stages of the project.
Culminating Project objectives
- To create work that effectively uses the design principles: figure/ground relationships, contrast of shape, contrast of light and dark, contrast of color, visual hierarchy, symmetry and asymmetry etc, to express ideas and emotions.
- To use the techniques and tools that we have explored in class to best express the ideas and emotions of the work.
- To use the iterative process to refine and improve the work and arrive at the best possible solution.
- To reflect on your process and your choices for the making of this work.
Some thoughts on Process:
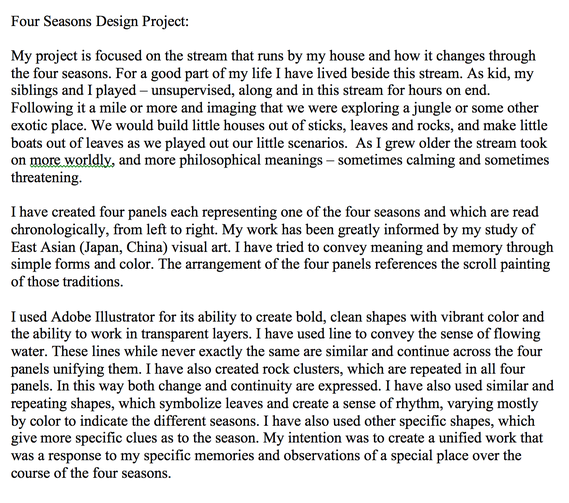
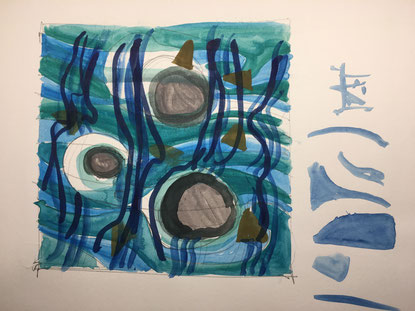
I created a simple version of this project. The following images are from my sketchbook, and give somewhat of an idea about my process for this project. Although your process will not look like mine, hopefully this will provide some guidance.
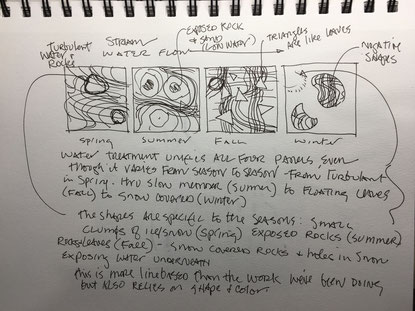
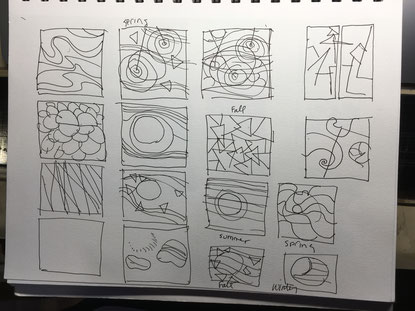
Process Details and Timeline
- Begin by working in your sketchbook. Use the sketchbook to write down your possible ideas for this project. What memories or other response can you call forth to provide the content for this work? How do you want to organize the elements within the four panels as well as the panels themselves to best express your ideas? It is important to write as much as you can here, because it will become the basis for writing your artist's statement at the end.
- Continuing in the sketchbook: begin sketching out some basic ideas. Use colored pencils and/or markers to approximate your colors and shapes.
- Conference with me or a classmate to critique your work. Make sure you take notes of your conversations and consider them as you continue to develop the project.
- When you feel like you have enough direction to begin - start experimenting with your chosen techniques and forms. Discover which ones are best suited to your intentions for the work. Feel free to improvise, respond to the "happy accident".
- Use the iterative process and document the evolution of your work. Take a photograph or screen shot of each significant change in the work, or alternatively, at the end of each work session. Post these to your portfolio.
- Complete the four compositions and post to your portfolio.
- After you have completed the work, write a short artist's statement describing your intentions for the work, What was your approach and what were you trying to say? Describe your choices of color, shape, technique and materials and how and why you used them to express your ideas, emotions or concepts.Post this reflection underneath your final images of the work.
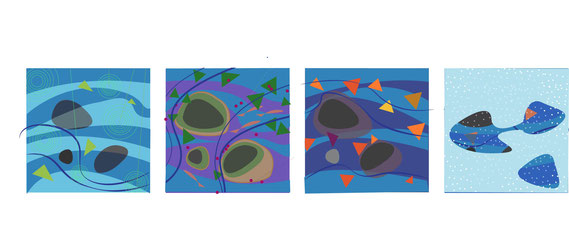
Example of the project and statement as it should be posted in your e-portfolio.
This is the artist's statement that I wrote for my project.