 BBA Design:
Foundations
Advanced Projects
BBA Design:
Foundations
Advanced Projects
DESIGN PROJECT #2 - HALLWAYS OF THE SEMINARY ANNEX
Special Note:
This Design Project will consist of 3 introductory activities which will build the skills needed for the main project. The main project follows the activities and is detailed below.
Activity 1 - Visualization of Solutions
In this activity you will be introduced to a common drawing method used to visualize and create your design.

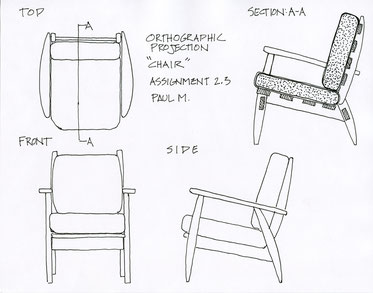
Orthographic Projection of a Chair
Watch the Video below which introduces you to some important drawing concepts. Please take notes in your sketchbook and add drawings as you watch to help you visualize and understand the techniques.
Watch this presentation for more details on how to create an orthographic projection
Drawing Assignment:
In your sketchbook, draw the wooden block that you were given.
Draw this free hand and provide the basic orthographic views that you need to communicate all the visual information of the block.
Measure all of the dimensions with a regular ruler. (Demonstration)
Add any notations you feel are necessary to add of clarify information.
Activity 2
Architectural measurement (The Architects Scale Rule)
How to read an architect's scale ruler
Print and fill out the worksheet. This is a graded activity
Construction Drawing and Details for Interiors
All you need to know about drawing for this project
Activity 3- Perspective Drawing
Watch the video on perspective drawing. This has a lot of information in it which is all important, but you do not need to use it all right away.
Draw at least 4 blocks (following the instructions in the video) locate your blocks at different locations in the drawing but always use the same horizon line and vanishing points. First draw lightly in pencil then ink over the object.
Due this on 8.5x11" plain paper.
Activity 4- Making a 3D model in SketchUp
You will now take the information in Activity 1, and you will use this information to create a 3d model using SketchUp.
IMPORTANT NOTE:
If you are not familiar with the sketch up modeling software you will need to do the tutorials. Please go to the Resources page of this website (navigation menu to the right) and look for the link to the Sketch Up tutorials. All four tutorials are valuable but for now just do the first one. That will be enough for this part of the project.
Part1.
Taking the your drawing from Activity 1, create the block in SketchUp. Check with me for specific instructions and requirements for this part.
- After you have finished your model you will transfer the model to a second related program called Layout. Again, check with me for how to do this.
- Once in Layout you will create a orthographic projection drawing TO SCALE.
- After you have finished your drawing you will print it out on 8.5x11" printer paper using the Steam Lab printer.
By successfully completing the previous activities you should now have the basic skills needed to do the main project

THE HALLWAYS OF SEMINARY ANNEX -MAIN PROJECT
The BBA hallways function as transitional spaces but also have been increasingly used as places to sit and socialize and/or do work. The growing student population has created a premium on space – any space. For example teachers have increasingly utilized these spaces to conference with colleagues or students. In the Seminary Annex on the first and second floors, over the last couple of years the lockers have been removed leaving some voids (alcoves) in the wall, which have been trimmed in wood and currently function as seating and display areas. These spaces offer an interesting challenge. Your task is to re-design these spaces to better accommodate the various uses described above and/or expand their functionality.
The 5 parts of this project, (including its presentation), will be graded separately (as activities) according to the project rubric. Additionally, the project will also be graded cumulatively (as a project) at its conclusion. The reason for this is to encourage re-visitation and re-evaluation of the various phases of the design process emphasizing the iterative nature of the process and hopefully leading to a more thoughtful and successful design.
DESIGN PROBLEM:
In what way can we re-design the existing alcove spaces in the hallways to better utilize them for the various tasks and purposes that enhance learning?
PART 1 -CONCEPTUAL DESIGN PHASE
Defining and Researching The Problem: Group Work:
This phase of the design process will be completed and assessed as a group and the information collected will be shared among the individual designers.
1. Develop a list of questions and talking points to use when interviewing students and teachers.
2. Interview at least 3 students and 3 teachers. The teachers must be teachers whose classrooms are on the 1st and 2nd floors of the Seminary Annex. Students should reflect the diversity of our student community. Do not pick your friends!
Document, analyze and summarize these interviews. Write this reflection in your sketchbook.
3. Together, create a list of at least 5 user needs and prioritize them from most, to least important.
4. Each designer must develop multiple sources of research (at least 3). At least one of these must be from a book, magazine or other printed material. Document (photo screen shot, scan etc.) these sources in your sketchbook or a suitable digital document. Annotate (explain and comment upon) all of your sources.
5. Gather all information that you need from the site: photograph, field measurements and other field notes on the SPECIFIC conditions of the site that may affect your design.
6. Together create a slide presentation that comprehensively shows the defining the problem and research phases of the project. individually post to your e-portfolio.
Learning Scale for Part 1
|
|
Getting Started |
Making Progress |
Proficient |
|
Defining the problem is the important first step in the design process. Defining the problem means thinking deeply abut the problem that has been identified and asking, what exactly is the problem I am trying to solve and from what point of view?
|
I have begun selecting “stake-holders” to interview and develop a list of questions.
I have not yet interviewed anyone.
I have not collected any information on the specific site. |
I have begun interviewing multiple stakeholders who represent different perspectives on the design problem.
I have started to document my interviews. I have not yet developed a list of user needs.
I have begun collecting information on the specific site and have recorded this in my sketchbook or other appropriate document |
I have interviewed multiple (at least 6) “stake-holders” who are affected by the problem and listen to their stories. These stakeholders should reflect a range of opinions and points of view.
I have documented, summarized and analyzed their responses in either my sketch book or a digital document.
I have developed a list of 5 “user- needs” and prioritized them. These will guide my design process.
I have collected all of the important information on the specific site, have recorded it |
Part 2 - Developing Design Concepts (individual work)
Using the information gathered in Part 1 of the project, develop 3 or more concepts that reflect the user needs that you have developed and take in to consideration any other factors you have discovered along the way. If possible create more than one variation of each concept. Since this is a three dimensional design problem you should also consider using sketch models to work out some of your brainstorm ideas.
- Work out your initial brainstorms in your sketchbook and/or in preliminary sketch model form
- Create 3 finished concept drawings on separate pieces of white paper 8.5x11” and/or three more fully developed models -
Criteria for the Concepts:
Drawings should be clearly labeled, drawn in ink and notated where appropriate.
Some indication of rough size should be included.
Drawings should be of sufficient size to convey all the important information. You may need to show multiple views of your design.
Each page should include a title block with your name, project name, name if the class (Design-Studio) and the date you completed the drawing.
If you are using a sketch model: The models should be done to an appropriate scale. Made quickly but neatly. They do not have to shown a high degree of detail but should communicate the important features of your design concept.
NOTE:
For the drawings: employ the techniques of drawing that you have acquired in previous projects such as: orthographic projection and perspective. In your sketchbook you can draw in pencil but on your finished drawings first draw lightly in pencil then go over the lines you want in ink – then erase the light pencil lines.