 BBA Design:
Foundations
Advanced Projects
BBA Design:
Foundations
Advanced Projects
Point, Line, Plane - The fundamental elements of design

Point, Line and Plane are the most basic and fundamental elements of design. The fundamental elements can be thought of in two basic ways: Conceptually, as they are used in geometry, and Graphically, as we see them in applied in the visual arts.
.
Point: in conceptual terms a point has no dimension - only location. It designates some point in space. However, to graphically represent a point we make a dot or some kind of mark that we perceive as dot like. A point can also be represented as the intersection of two lines. Points can be actual or implied. Our perception of a point changes, from a point to a shape as the size of the point grows in relation to other elements in the composition and/or the size of the ground and frame.
________________
Line: A line has only one dimension. Conceptually it has length, but no depth, it can connect two points. Graphically, it can be thought of as a mark that's dominate attribute is length, even though it must have some width in order to be seen. A line can be thought of a point in motion, or as a series of points which can extend in either direction forever, or can be terminated by points. Lines define edges of surfaces and enclose shapes. A line can be actual or implied. A line can be seen as a positive element or a negative(a gap). Our perception of a line changes, from a line to a shape (plane) as the size of the line grows in relation to other elements in the composition and/or the size of the ground and frame.
///////////////////////
Plane: A plane can be thought of as a line in motion and of having 2 dimensions length and width. In order to create a plane the line moves in a direction that is other than its primary direction. A plane in 2d graphic terms is a shape. It is a surface with length and width that encloses an area. When shapes have 3 dimensions they are called forms. In 2d graphic design forms are created by using value and line to create the illusion of depth ( the 3rd dimension)
Activity 1 - Point, Line, Plane presentation
Please view the presentation and take notes in your sketchbook. Make sure to date and label your work as Unit 3- Activity 1.
https://docs.google.com/presentation/d/1AzTKpPGBbuj-w1xija3i6cia3u5cfI0JxXAUiA2g80g/edit#slide=id.p4
Also part of this activity: view these short videos to gain more understanding of Point, Line and Plane. Take notes in your sketchbook
These videos present the elements in an architectural context, but the concepts remain the same for all 2d and 3d design.
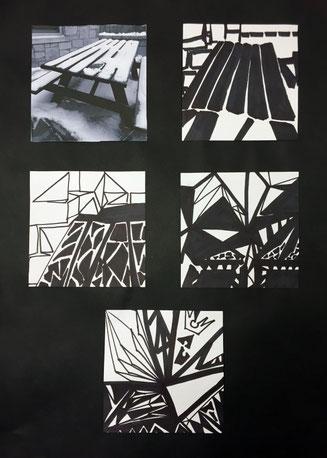
Project: Point, Line, Plane - ZOOM! (From Representation to Abstraction).
Objectives:
To be able to identify the basic elements: point,line, and plane, as they exist in our everyday environment
To use photography to record the elements and to edit, crop, frame and otherwise alter the photographs in Adobe Photoshop.
To use the concept of framing to explore pictorial possibilites!
To use drawing and an iterative process to explore unexpected possibilities and arrive at an unanticipated and interesting place with the image.
To present the work in manner that shows thought and care in its arrangement and execution.
Criteria and Process
A successful project will follow the process and meet the criteria described below.
Part 1
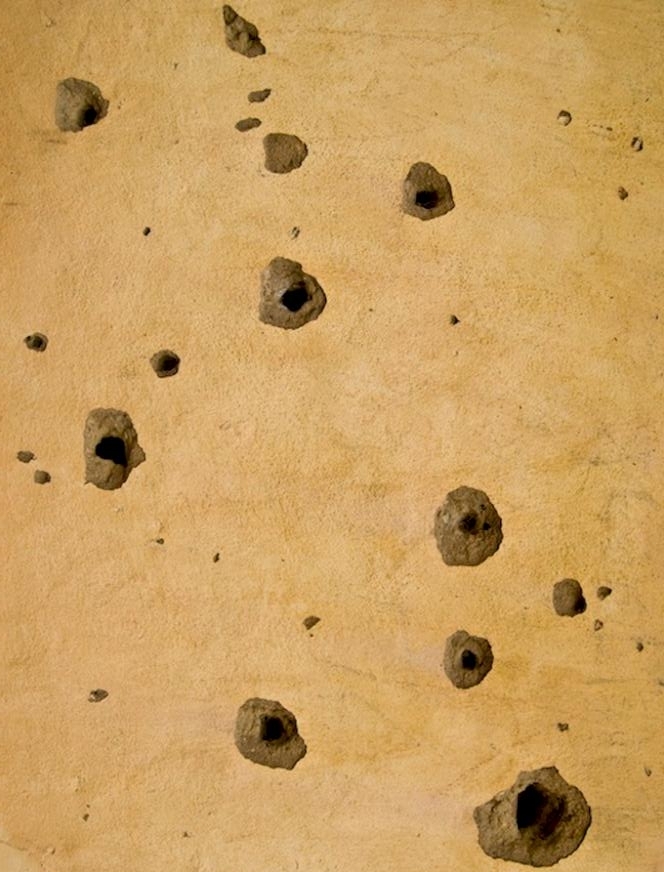
Take your camera, phone, or ipad and explore the campus to find 3 examples of each: point, line and plane. You will take a total of 9 photographs. Use the default setting for a rectangular format, Do not use a square format to take the photo.
When taking the photographs, try to frame your photograph in such a way as to emphasize that specific element, in other words, make it the most important thing in the photograph.


- Select your 3 best photos form the original 9: one each of point, line, plane. Post these to your portfolio in their original format.
- In Photoshop: crop your 3 photos using a square format. Move the cropping tool around your image and consider: What is the best way to crop your image. How can cropping change and improve the clarity of the element you are focusing on?
- turn your cropped images black and white, then post them into your portfolio as in the example above.
- Select ONE image: either point, line or plane, resize it to a 6": square and change the resolution to 300 dpi (see me for help on this).
- Print this image to use for the rest of the project.

PART 2
Process and Criteria
READ THROUGH ALL DIRECTIONS BEFORE YOU BEGIN. PLEASE ASK QUESTIONS IF YOU DO NOT UNDERSTAND SOMETHING!
In this part of the activity your will make four drawings using one of your photographs as the initial reference for either: point, line or plane.
A successful project will achieve these things:
- A degree of visual continuity across the images.
- A significant difference or evolution from the photograph to the last image, and that the last image could not have been predetermined or anticipated.
· Each drawing should take approximately 20 minutes.
· Each iteration (version) will inform the next, as you move through the assignment. For example you may want to select on particular area of your previous drawing that particularly interests you to develop further.Using a "viewfinder" to help you make your choices.
- Make a viewfinder by cutting a 4" square of poster board with a window that is a 2" square
· You are free to make creative choices as you see fit as long as they have some relationship to the previous drawing. Think of each series of drawings as a movement from objective (the original photo) towards abstraction.
· YOU MAY ONLY USE THE PREVIOUS WORK AS YOUR REFERENCE. AFTER THAT YOU MAY NOT LOOK AT IT AGAIN! Turn over or put away, all other previous work.
· Create 4 6” squares out of white drawing paper.
· Use only black sharpie marker – no pencils or erasers.
Presentation
Arrange your 5 images (1 photograph and 4 drawings) on some kind of surface in the way that best shows your work. NEATNESS AND ACCURACY COUNT!
Feel free to explore creative possibilities in the presentation of your work.
Photograph your work and upload to your portfolio.
Reflection:
Use the prompts below to write a short paragraph reflecting on this work.
- Was it difficult to find and identify the elements point. line and plane in the environment, why or why not?
- How is your last drawing different from the original photograph? Do you think you could have anticipated the end result of this project? Why or Why not?
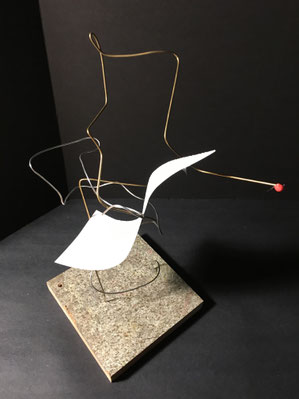
Project - Point, Line Plane - 3D
Point, Line and Plane –This project can be approached in one of two ways:
- Based on your final drawing for the previous project, create a non-representational 3d sculptural form.
- Choose a word, or a feeling or emotion to express and create a non-representational form.
Regardless of what approach you decide to use your project
will integrate all three of the elements (point, line and plane) into your sculpture. Your composition should be thought of as a kind of conversation or relationship between the different elements.
Project Objectives:
Consider the different qualities and characteristics of a material and how to best use them to express ideas, concepts or feelings.
To be able to translate and extend a 2d drawing/idea into a 3d composition and to use the elements: point, line and plane in a 3d composition that is self-supporting and which is not more than 12” in its largest dimension.
To explore and use design principles such as balance, movement, the degree of contrast (similarity & difference) and the use of negative/positive space.
Criteria:
Your composition must:
Contain two Linear Elements that express different qualities of line made from two different materials.
Contain two planar (flat shape) elements also made from different materials.
Contain at least two representations of a point (one actual and one implied).
Be no more than 12” in its largest dimension
Be self-supporting.
Process:
Explore your preliminary ideas in your sketchbook. Do at least 3 different quick sketches.
Gather your materials and consider which materials and methods of construction would best suited to design
Begin the construction of your sculpture. Be alert to opportunities for changing and evolving your design, be aware, as well, of what is clearly NOT working and adapt your approach as needed.
Consider how you wish to present your sculpture (remembering that it must be self-supporting).
Material Options:
You will select your materials from any of the commonly available materials in the studio. You are also free to bring any materials in from home. Some possibilities include:
Materials that have a linear quality:
Wire, of various thickness and flexibility.
String or twine, rubber bands
Wood dowels, sticks, skewers, toothpicks etc.
Materials that have a planar quality:
Luan (thin plywood)
Sheet metal, aluminum foil
Cardboard, boxboard, paper etc.
Thin plastic sheet (acetate) or other thin plastic materials.
Fabric
Materials that represent a point
Beads and small stones are obvious choices, but I encourage you to experiment and explore different options. Remember that size relative to the other elements in the composition is an important consideration when representing a point. Also remember that one of your points may be implied. Think carefully about the definition of a point.
Photograph and Post your work!
Photograph your finished work with a strong directional light on a white or black background. include at least 3 different views.
Post this to your portfolio.
Reflection:
Please write a short artist's statement describing your process in creating this work. Consider the different physical qualities of the materials. Discuss what meaning or associations the materials themselves might have and explain how you arranged them to create a unified work that expresses a relationship or a conversation.
Here is a reference for some of the ways that you can join wire and may be helpful in this project.
